How to Get Custom Built-In Shelves on a Budget

If you build it, books will come. (And plenty of compliments too!)

Built-in shelves can take your room from boring to bespoke in a snap. Unfortunately, they can also come with a hefty price tag.

But I’m going to share the insider secrets you need to DIY your way to rich results without breaking the bank. (Hint: The secret is starting with assembled bookcases, like the IKEA BILLY!)

Check out this dramatic before and after:

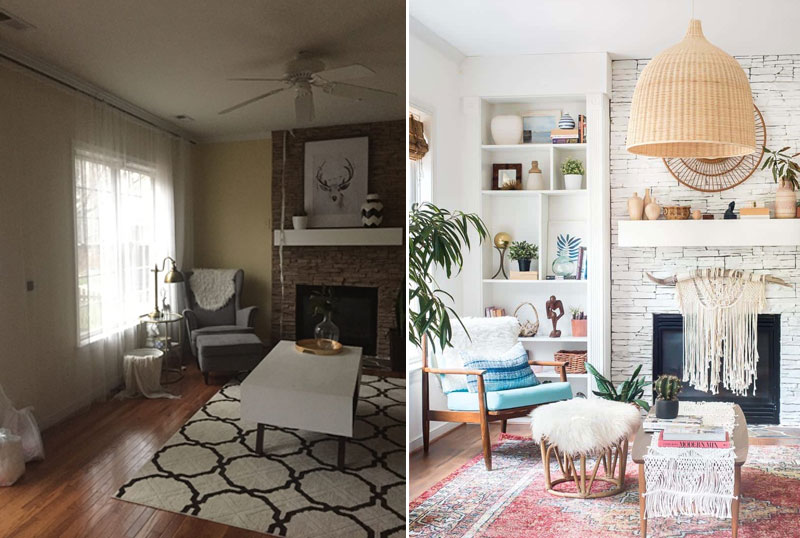
I still walk in sometimes and can’t even believe it’s the same room. Of course, there have been many other updates and projects to get this look, but the shelves definitely set the stage.

Let’s get started!

Materials

Note: Always measure first to get your supplies right. Our measurements were not exactly equal, with a width of 41″ on one side of the fireplace and 43″ on the other. But we compensated with our build-out around it, and it made no difference at all.

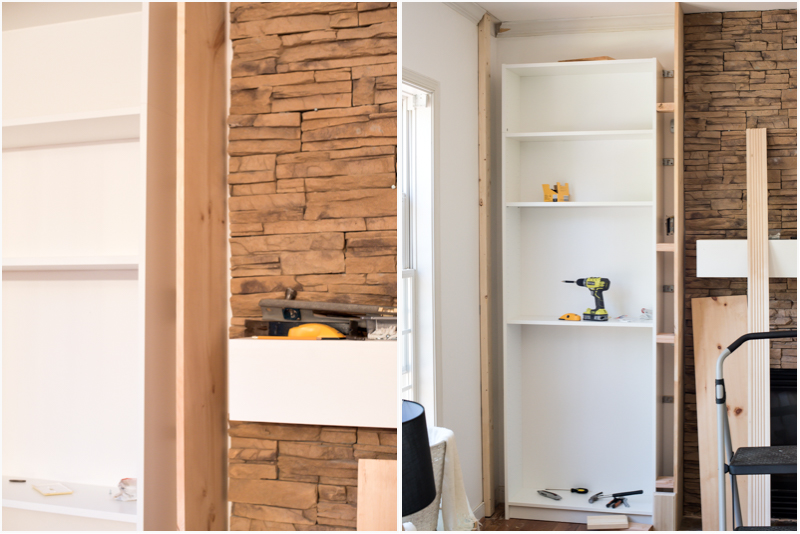
  • Two BILLY bookcases with extension, or similar product
  • Two 1″ x 12″ x 6′ whitewood boards (for tops)
  • Two 1″ x 12″ x 10′ whitewood boards (for visible sides next to fireplace)
  • Two 1″ x 4″ x 12″ common boards (Each cut to length, then screwed into the wall studs flush behind each shelf for support. This compensates for the 1″ difference in the whitewood boards and BILLY bookcase depth)
  • 3″ drywall screws to attach common board to studs
  • Three 2″ x 4″ x 10′ boards (for hidden sides next to walls and for header frame)
  • Eight 2″ x 4″ x 11″ pieces (to fill gaps between shelf and whiteboard on fireplace side)
  • Four  4 1/4″ x 1 1/8″ x 9″ plinth blocks of choice
  • Four  4 1/4″ x 1 1/8″ x 4 1/4″ plinth blocks of choice
  • Four 15/32″ x 3 9/16″ x 96″ strips of millwork molding (to cover the left and right edges of each shelf)
  • Eight 1 1/2″ x 2″ x 1 3/8″ 18-gauge steel brackets and nails
  • Brad nails (or finish nails)

Tools

  • Miter saw or skill saw
  • Brad nailer (recommended)
  • Drill kit
  • Tape measure

Let’s build!

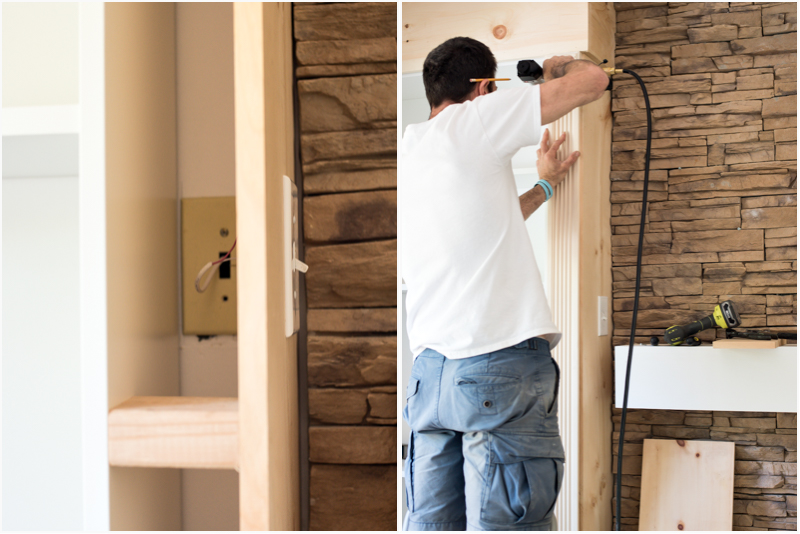
  1. Mark your studs, and screw the cut 1″ x 4″ common board to the wall and into the studs with the drywall screws, spaced every 6-12″. Space the strips a few feet apart from top to bottom to get the best support.

  1. Cut out the crown molding, shoe molding and baseboard if needed.
  2. Press the bookcases flush to the strips on the walls, center them and attach the steel brackets to the bookcases and the strips screwed to the walls.
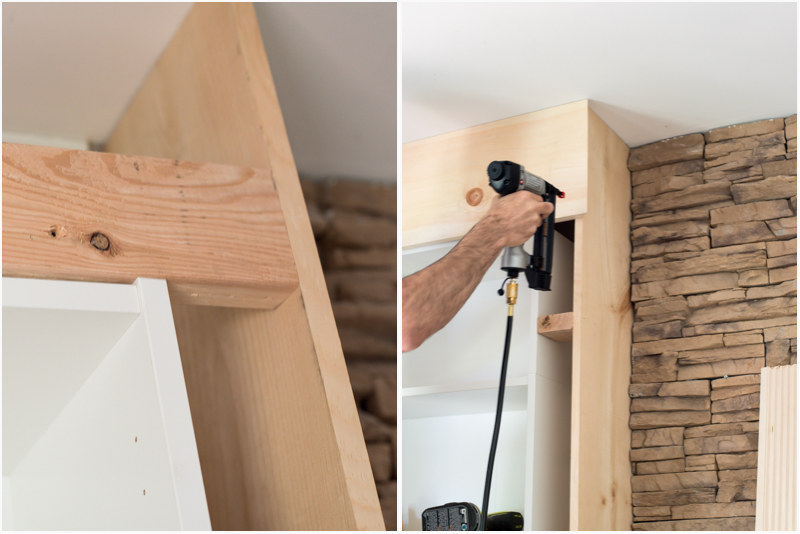
  3. Measure (ceiling to floor) the wall side where you want the outer edge of your shelf.
  4. Cut the 2″ x 4″ to length and attach to the wall.
  5. Measure (ceiling to floor) the fireplace side where you want the edge of your shelf.
  6. Cut the 1″ x 12″ whiteboard to length and attach using 2″ x 4″ blocks to hold the gap.

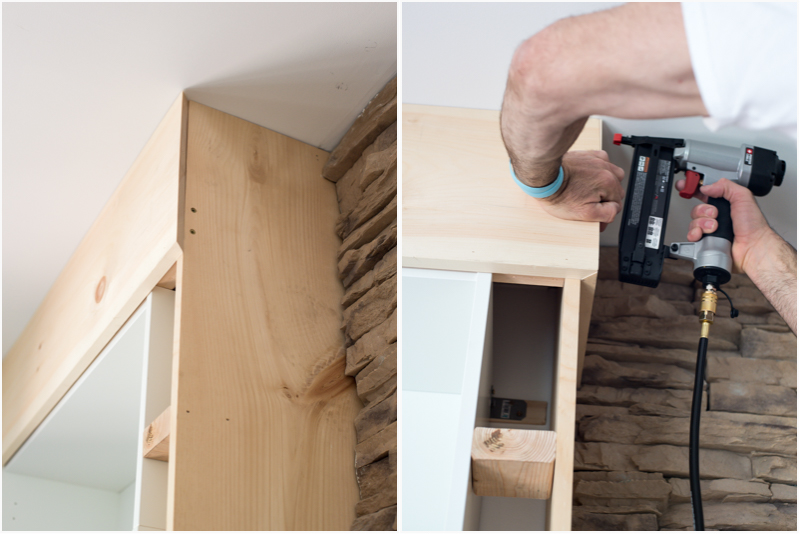
  1. Measure from the inside of the 2″ x 4″ to the inside of the 1″ x 12″ across the top of the bookcase. Cut another 2″ x 4″ to fit the space, and screw it in on each side.
  2. Measure and cut the 1″ x 12″ whiteboard designated for the top. Brad nail across the front first and then the side.

  1. Now place and brad nail the plinth blocks.

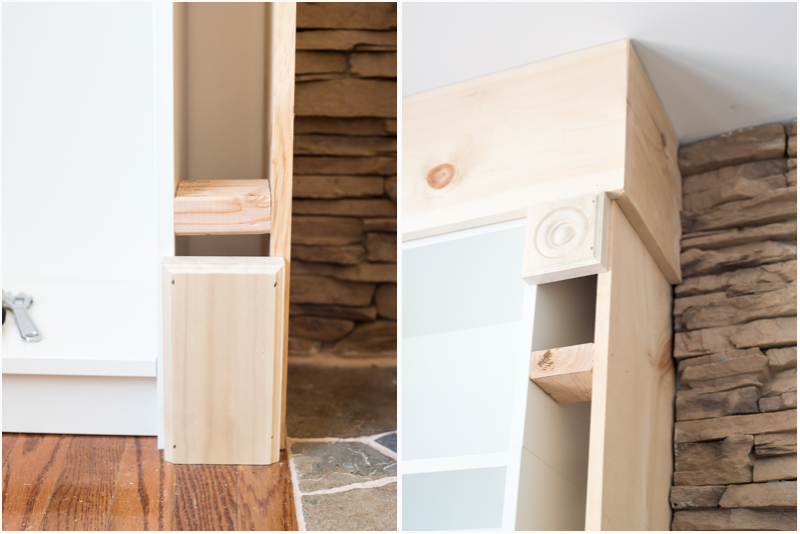
  1. Next, measure and cut the millwork to length, and brad nail that into place.

  1. Arrange shelves as desired. I cut a few in half to make the vertical breaks and used another 1″ x 12″ to fill the remaining longer gaps to my liking.

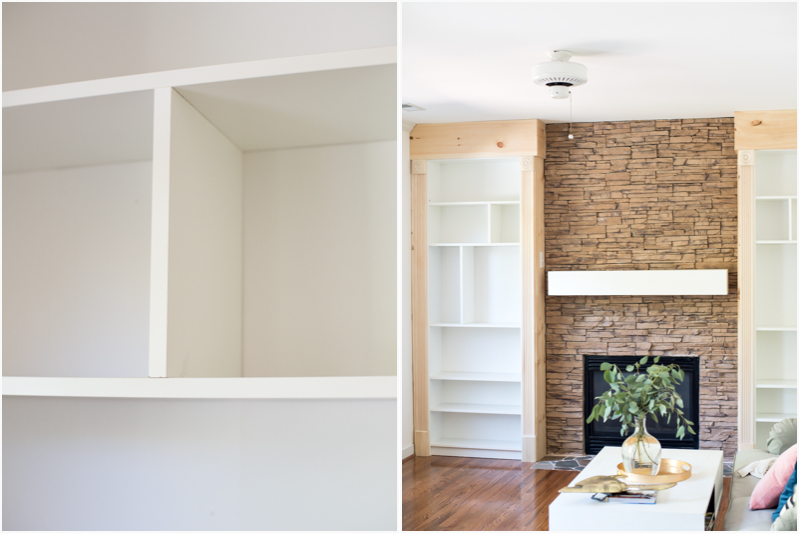
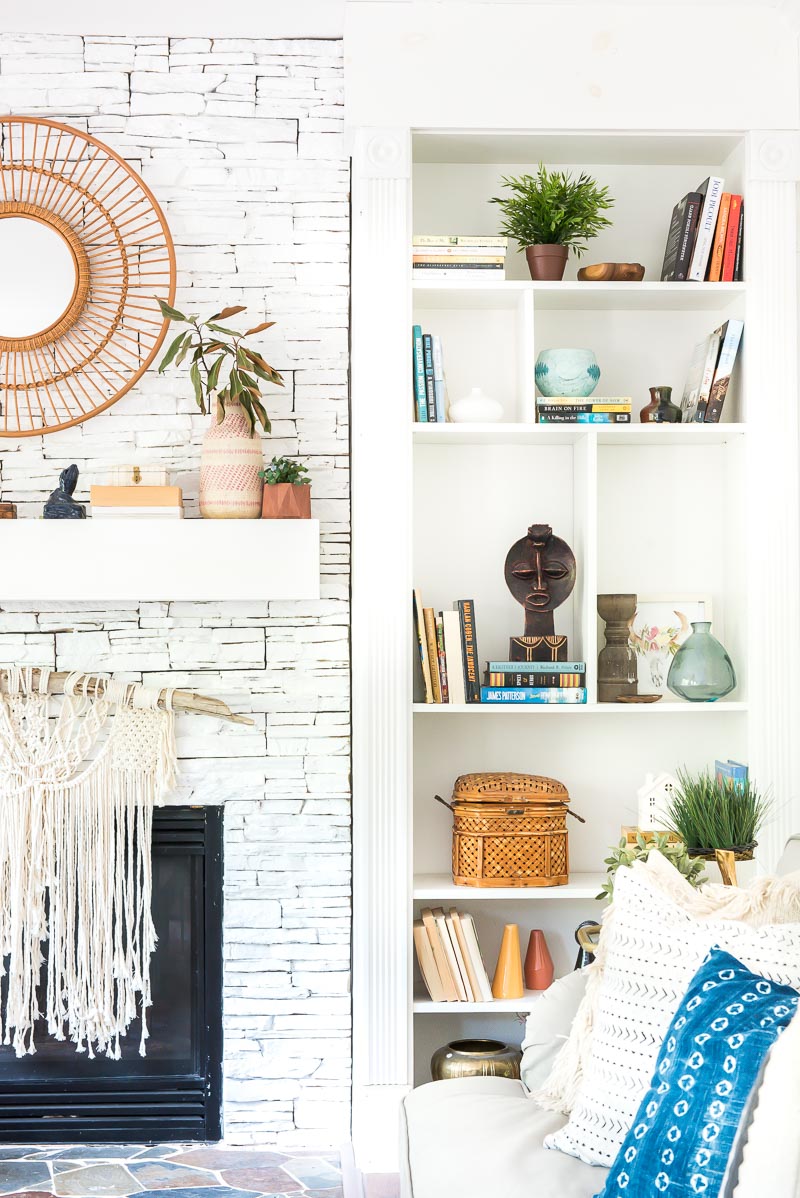
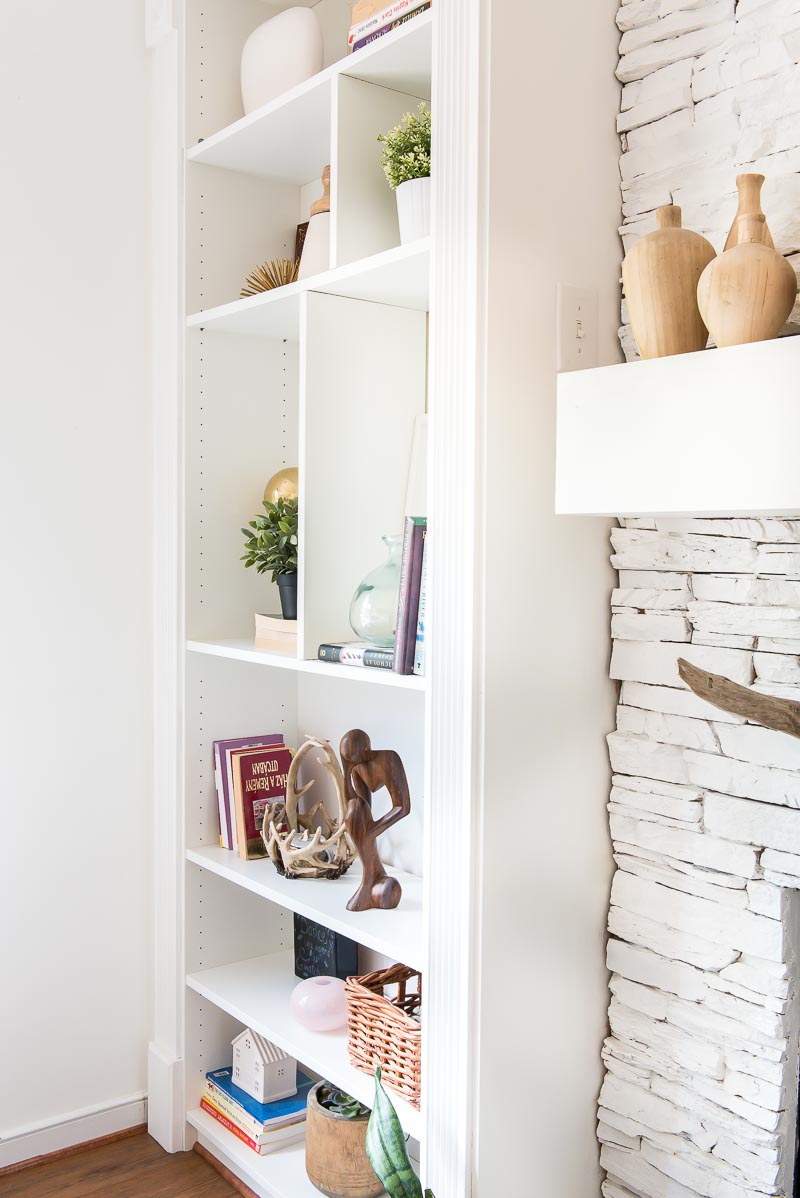
  1. Paint, stain and decorate as desired. Here’s our finished product!

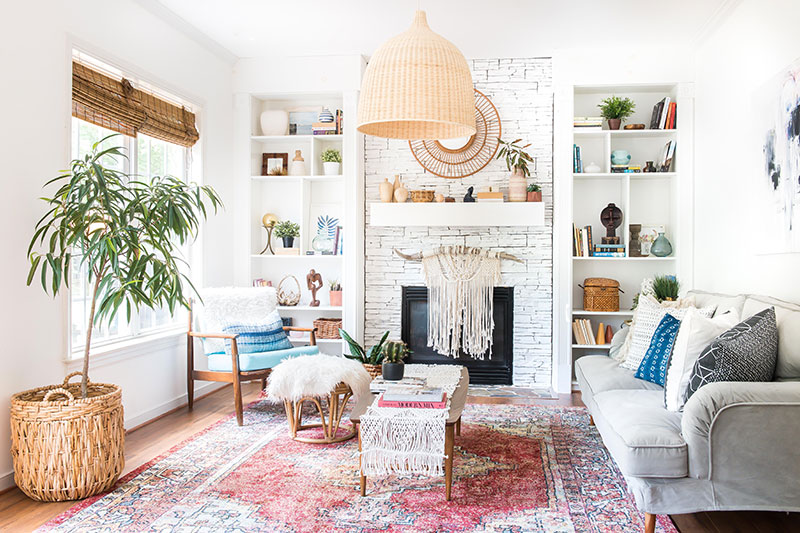
Now it’s time to invite your friends over to enjoy your upgraded space and spoil you with compliments on the fruits of your labor … manual labor, but it was worth it, right?!

These are pretty much guaranteed to be a clutch selling feature if you do decide to put your house on the market. In the meantime, I hope you love your new custom built-in bookcases as much as I love mine!


Via: https://www.zillow.com/blog/built-in-shelves-hack-226769/

Some Tips to Build Equity

I was having a great conversation with my 18-year-old daughter, Lexie, the other day on our way up to Joplin to see some family. I’m having her read a book by Dave Ramsey and she had questions about all kinds of things and one stood out to me. “Hey, dad, what’s home equity?” I was both excited and proud that at 18 she’s trying to figure these things out about money and investing. I was pounding dirt in the Marine Corps thinking about the next 48 hour “libo” around the corner. And, as a Realtor, I was pumped to share some knowledge with her.

Building equity through homeownership is a great way to increase wealth, but it doesn’t always happen that easily, or very quickly. Let’s dig in a little.

First, home equity is the percentage of your home’s value that you own.

In this blog, we will take a closer look at how to increase your equity without increasing your budget or blowing the budget out altogether.  And, potentially how you can access it when you need it.

How to determine how much equity you have

Equity is easy to figure. When you first buy your home and you put 5% down, that’s 5% in equity that you have. If your home appraises for more than the purchase price, then add the difference to the total. So, on a $200,000 home and you put 5% down and the home appraised for $205,000 you have $15,000 in equity.

From 2016 to the first quarter of 2018, most first-time home buyers in the U.S. started with about 7-percent equity, according to Inside Mortgage Finance. This is encouraging because it shows you don’t need to spend years saving for 20 percent down or more before you buy. Repeat home buyers started with more equity, at about 17 percent.

How to build your equity

Here are 6 ways to let your home build wealth for you. Some require time, money, or both. It would also be wise to consult a lender who can help you decide what would work best for you.

1. Home Appreciation

This can take a lot of time, or a little, depending on our market. For the last few years our home values have been on the rise and it’s been great for all of us here in Northwest Arkansas.

I was reading some research on Zillow and they have wrote “that the median home value grew from $185,000 in April 2016 to $216,000 in April 2018.” If you bought a home for $185,000 in April 2016 with a down payment of $12,950, your beginning 7-percent equity would have grown to 23 percent by April 2018.

We calculate this by subtracting your current loan balance ($165,600) from your home’s current value ($216,000). Then we divide the difference by your home’s current value. One-eighth of this additional 16 percent equity is from paying down your mortgage, and the rest is market appreciation.

If you waited two years and bought the same home in April 2018 with a 20-percent down payment of $43,200, you started off with 20-percent equity. You also used 3.3 times more cash to make the purchase. And here’s the kicker: Your total monthly housing costs would be the same, about $1,050 in both cases.

This example illustrates two things:

First, the power of home appreciation. It’s a lot like buying stock and benefitting as its value goes up. But there’s also a difference: While you’ll pay capital gains on rising stock value, you’re exempt from paying taxes on primary-home capital gains up to $250,000, or $500,000 for married couples.

Second, waiting to “save enough” isn’t the primary factor in determining if you can afford to buy a home. When it comes to qualifying for a loan, lenders do indeed look at your down payment. They’ll also want to know how much you’ll have in cash reserves after closing. But there are lots of options for low down payments that require minimal reserves.

There are a lot of factors that a lender will consider for deciding what you can afford on a loan. And debt to income, your monthly bills (or budget), and total income are huge factors that lenders will consider when deciding whether you can afford. And, it will greatly depend on the type of loan program you choose.

Lenders could allow you to spend between 43 percent and 49 percent of your income on monthly bills, which is actually on the high side and could strain your budget.

Since 2016, most first-time buyers have spent about 38 percent of their income on housing and other debt, which is a pretty safe cap for budgeting.

2. Put up as much as you can for the down payment

You can do this but, as we’ve seen, waiting to save extra cash can go against your broader financial interests if you lose the chance to build equity through appreciation. Therefore, you must strike a balance among down payment, monthly budget and savings for other priorities. A good lender can provide rate and market insight to help you do this. Ask me for a list and I’ll email it to you. 🙂

3. Use those Bonuses, Gifts, and Inheritances

Take advantage of work bonuses, family gifts and inheritances to pay down your mortgage (principal). If you choose to pay down in lump sums like this, see if your lender will recalculate your monthly payment based on the new, lower balance.

4. Make biweekly (or more) payments

Make mortgage payments every two weeks instead of once a month. Over the course of a year, this will add up to 13+ monthly payments instead of 12. You’ll build equity faster and shave five to six years off a 30-year mortgage. Just make sure your lender isn’t charging extra for processing semimonthly payments.

5. 15-Year Vs. 30-Year

Take out a 15-year mortgage instead of a 30-year mortgage, and you’ll build equity twice as fast. Two caveats here: You’ll have a significantly higher monthly payment and, because of that, you may have a tougher time qualifying.

6. Make home improvements

New appliances, new french doors, new roof, or cosmetic features like paint are unlikely to increase value (can/will increase the desirability, which can get you a better offer when you list to sell). Only big improvements like new kitchens, or additional bathrooms or other rooms will add meaningful value. Make sure the cost of such improvements will create the added value you’re looking for.

Want to use your equity?

You must borrow from or sell your home to use your equity. The three most well-known ways to get to your equity through borrowing are a home equity line of credit (HELOC), home equity loan or a cash-out refinance. Do some research and write a pros and cons list to compare.

Rates are rising right now so these borrowing options might cost more in the future. Always consult your trusted lender to determine the best approach for you.